Setting Up M5StickC Plus with MicroPython
I tried a lot of different things which didn’t end up working (even from the official M5Stack docs) and for some steps the instructions required downloading some obscure drivers/tools that I didn’t trust.
My requirements for this setup were:
- Ability to develop on MacOS
- Only open-source tools/libraries: esptool.py, ampy
- Python or a variant (MicroPython) for programming with additional M5Stack helpers
- Standard ESP32 libraries
Install esptool and erase flash
Connect the board to the MacBook directly with the USB-C cable.
pip install esptool

# Find the device's serial ID, use it for all upcoming commands
esptool.py flash_id

# Erase existing flash
esptool.py --chip esp32 --port /dev/cu.usbserial-XXXXXX erase_flash
Installing MicroPython
Follow instructions here to build
For building the firmware, use the right make command for the device:
make BOARD=M5STACK_StickC_PLUS BOARD_TYPE=stickcplus flash
Upon completion, it’ll print out a command to run. For some reason, it only works if the baud flag is removed:
~/.espressif/python_env/idf4.4_py3.9_env/bin/python \
	../../esp-idf/components/esptool_py/esptool/esptool.py \
	-p /dev/cu.usbserial-XXXXXXXXXXXX \
	--before default_reset \
	--after hard_reset --chip esp32  write_flash \
	--flash_mode dio --flash_size detect \
	--flash_freq 80m 0x1000 \
	build-M5STACK_StickC_PLUS/bootloader/bootloader.bin \
	0x8000 build-M5STACK_StickC_PLUS/partition_table/partition-table.bin \
	0x10000 build-M5STACK_StickC_PLUS/micropython.bin
Use MicroPython on the device
Use screen to connect to the board
screen /dev/cu.usbserial-XXXXXXXXX
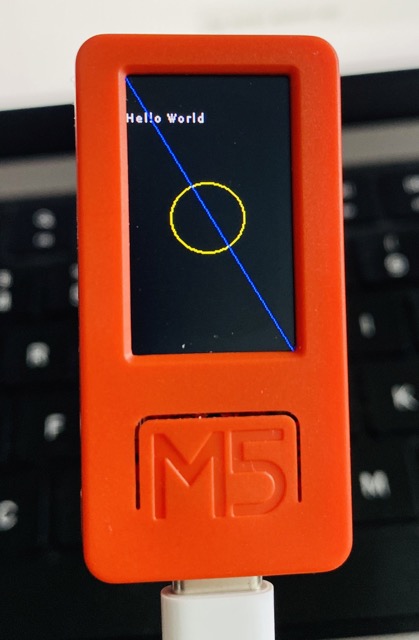
Test the LCD
from M5 import *
Lcd.print("\n\n\nHello World")
Lcd.drawCircle(65, 120, 30, Lcd.COLOR.YELLOW)
Lcd.drawLine(0, 0, Lcd.width(), Lcd.height(), Lcd.COLOR.BLUE)
Send python files to run on the board
From the MicroPython docs:
There are two important files that MicroPython looks for in the root of its filesystem. These files contain MicroPython code that will be executed whenever the board is powered up or reset (i.e. it ‘boots’). These files are:
- /boot.py - This file is run first on power up/reset and should contain low-level code that sets up the board to finish booting. You typically don’t need to modify
boot.pyunless you’re customizing or modifying MicroPython itself. However it’s interesting to look at the contents of the file to see what happens when the board boots up. Remember you can use the ampy get command to read this and any other file! - /main.py - If this file exists it’s run after
boot.pyand should contain any main script that you want to run when the board is powered up or reset.
Read/write files to the board:
pip install adafruit-ampy

# Save the port so no need to include in each command
export AMPY_PORT=/dev/cu.usbserial-XXXXXX

# See existing files
ampy ls -r
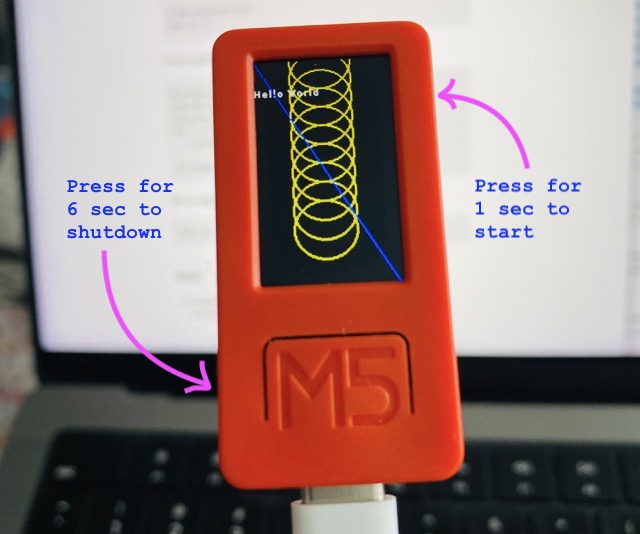
Create a python script to run on startup:
# script.py
from M5 import Lcd
Lcd.print("\n\n\nHello World")
for i in range(10):
    Lcd.drawCircle(65, i*20, 30, Lcd.COLOR.YELLOW)

Lcd.drawLine(0, 0, Lcd.width(), Lcd.height(), Lcd.COLOR.BLUE)
Save as main.py on the board
ampy put ./script.py /flash/main.py
Shutdown and restart, the main.py runs!
TODO
- CircuitPython seems to be more updated and has better support for peripherals. Migrate to CircuitPython in the future?